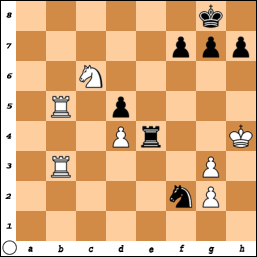
The following is a composed position that was inspired by a real game. Relatively minor adjustments were made to the game position, moving the Black queen from c8 to e6, the Black rook on c7 to c8, and swapping the position of the White queen and rook on b3 and c1, and finally moving the White pawn back from c6 to c5 to allow the preamble below.
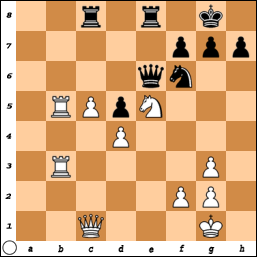
White has a winning advantage here, with an extra passed pawn, protected on c5, and with imminent threats against f7 or Black's queen. A typical line might be 1.Rb7 Re7 2.R3b6 Rxb7 3.Rxe6 fxe6+-. Some players, though, might reasonably be tempted to follow the well-known maxim that says that passed pawns should be pushed...
1.c6?
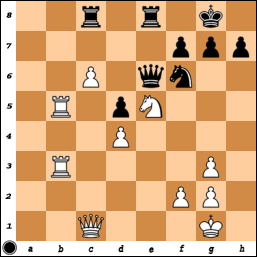
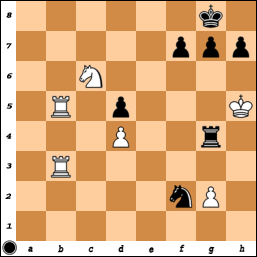
However, this allows a stunning combination that wins the pawn and would leave many players of the White pieces shellshocked:
1...Rxc6!!
To find this move, Black would need to look some ten moves ahead along a line where he is a entire rook down, and try and fathom whether the sacrifice is justified or not. Half the battle, though, is in deciding to look at this move in the first place.
2.Nxc6
White can avoid the rook sacrifice to keep the game level, but despite the difficulty in calculating the full outcome of the sacrifice, the psychological consequences of declining it would be devastating for most players. 2.Qxc6 Qxc6 3.Nxc6 Re1+ transposes to the game.
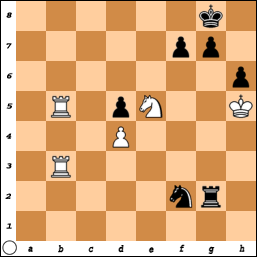
2...Qe1+ 3.Qxe1 Rxe1+ 4.Kh2 Ng4+ 5.Kh3
Attempts to secure the knight with 5...f5 or 5...h5 are tempting but fail.
5...Nxf2+ 6.Kh4
That was the easy bit, but now Black needs to decide how best to further his attack. A precise move order is needed, as well as the ability to visualise the many possible rook and knight mating nets and patterns. The first mating pattern, which White avoided by going to h4 with his king, is in the corner with: 6.Kh2 Rh1#.
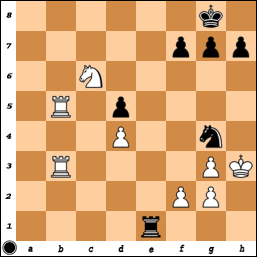
6...Re4+!
7.g4
Moving the king to the fifth rank gets mated in short order, with four possible mates taking place on f6, g5, h5, and h4. Try visualising these four mates while looking at the original position on move one.
(i) 7.Kg5 h6+ 8.Kh5 Kh7 9.Ne5 g6+ 10.Nxg6 fxg6#
(ii) 7.Kg5 h6+ 8.Kf5 g6+ 9.Kf6 Ng4# the only knight mate, spoilt slightly by the alternative of Re6#
(iii) 7.Kh5 g6+ 8.Kh6 Ng4+ 9.Kg5 f6+ 10.Kh4 Nf2+ 11.g4 Rxg4#
(iv) 7.Kh5 g6+ 8.Kg5 Kg7 threatening three possible mates, two with the pawns 9.Rb7 Rg4# a very visual mate that fills up most of the g-file
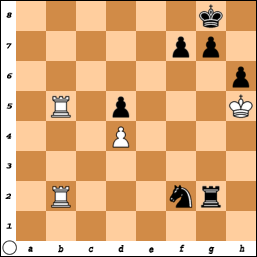
7...Rxg4+ 8.Kh5
At this point, Black faces another difficult choice. Various pawns moves look tempting, but only one works.
8...h6!!
At this point, White can bail out with a draw by attacking Black's knight, forcing the perpetual check on g5 and g4, but many players of the White pieces, being a rook up, might be tempted by the other lines, which is why they are given here as well.
9.Ne5?
This move attacks the rook. The other line is White playing Rb7 to put pressure on the f7 pawn, but that also wins for Black.
(i) 9.Rf3! Rg5+ 10.Kh4 Rg4+ 11.Kh5 Rg5+= This perpetual, which is the main line, also occurs after White plays 9.Rb2. In both lines, Black can take the pawn on g2, but White sacrifices his rook for the f2 knight and takes the d5 pawn, so Black has to take the draw
(ii) 9.Rb7 Rxg2 Removing the last of White's kingside pawns, leaving Black with three passed pawns, while also threatening mate with the rook on h2. The key point here is that unlike most lines where Black threatens to go to the h-file with mate, White cannot respond with a rook move to prevent the mate. Here, the White rook move to b2 is foiled by the Black knight on f2 shielding the rook. 10.Rh3 White is forced to give back the rook to avoid mate, but Black is still winning. 10...Nxh3 11.Ne7+ Kh7 12.Nxd5 Ng5-+
9...Rxg2
Just like in the Rb7 sideline, White is curiously helpless against all the threats. Even though his knight seems to be helping, it can't do much beyond sacrificing itself to stave off mate.
10.Ng4
The other lines allow three more rook and knight mates to go with the four above:
(i) 10.Nf3 Kh7 11.Rb6 g6+ 12.Rxg6 fxg6+ 13.Kh4 Rg4#
(ii) 10.Kh4 g5+ 11.Kh5 Rh2+ 12.Rh3 Rxh3#
(iii) 10.Nxf7 Kh7 11.Nxh6 g6+ 12.Kh4 Kxh6 13.Rg3 Rh2+ 14.Rh3 Rxh3#
10...Nxg4
White's tenth move does set one nasty trap that Black needs to avoid: 10...Rxg4? 11.Rb8+! Kh7 12.Rh8+!! Kxh8 13.Rb8+ Kh7 14.Rh8+ Kxh8 stalemate. This is a curious echo of the finish that occurred in the game that inspired this position, but in that game it was Black sacrificing his rook on h1 to force a perpetual, rather than a stalemate!
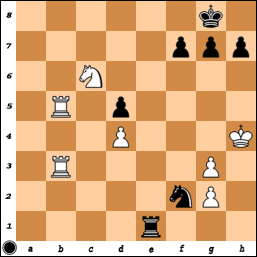
11.Rb2 Nf2
Humiliatingly, with the mating threats still present, White has to give up the exchange as well as the knight he gave up on the previous move, leaving Black three full pawns ahead due to the obliteration of White's kingside by the Black rook and knight working in tandem.
12.Rxf2 Rxf2 13.Rxd5 Rf4
Though the position is already lost, the closing of the mating net once again is the final straw.
0-1
